Stacking Functions Garden


Leave a comment

Herb drying

Here it is: my ultra high-tech, herb drying system extraordinaire for 2011.

Three bunches of oregano, ready to dry out on top of the fridge for a couple weeks.  When they’re done, I’ll pick something else to dry. Doing it piecemeal this year instead of all in one shot, like I did in 2010. A detail of the twistie-tie and wood handle system:

This is the second batch of oregano I’ve dried, so I can report it works pretty well. Keeping it on top of the refrigerator ensures that I don’t forget about it.  We’ve also started drying some chamomile flowers for tea, and plan to dry quite a bit more mint this year in hopes of making our very own permaculture tea this winter.


1 Comment

Milkapalooza!

Yes, there is an event called Milkapalooza, and yes of course we went to it this weekend. It was a blast. Anneke, it turns out, is a natural at milking cows:

The event featured tours of the Minars’ farm, and I eagerly soaked up every minute. This was our opportunity to see where our milk comes from! And considering how much yogurt, butter, and ice cream we make with their milk/cream, a fair amount of our family’s daily calories come from this patch of grass and cows near New Prague, Minnesota. Here are some of the highlights from the tour:

Here’s the winter hoop house (not sure if that’s the right term) — it’s a simple structure where the cows go in cold weather. There is no barn for them to sleep in — this is it.  The bedding at the bottom is turned frequently, and as it decomposes, it heats up (this is all part of the process, as those of you who compost know). The heat is plenty for the cows, even in Minnesota winters.

The milk parlor was a little dark, so sorry for the low quality.  I’ve only seen a handful of milk parlors, including my Grandpa Rensenbrink’s very low-tech one, so this was very impressive. They can milk 32 cows at once!  Looking at the picture, basically cows would be facing you. The person goes down a set of stairs into a galley where they have easy access to all the udders to hook up the machines. It was pretty neat and efficient, and very clean.

The family raises pigs and chickens too, but not for commerce necessarily (that I know of anyway). Those were some darn happy pigs. Anneke naturally thought they were completely adorable and said that one in particular looked exactly like Wilbur from Charlotte’s Web.

Finally, the cows themselves. My, what beautiful girls. The milking herd is about 150 cows, which seemed like a small number to me (not really sure on that though). They have several different breeds including brown jerseys like this one. So, Cedar Summit Farms is different from conventional and even some organic dairies in several key ways:

1. The cows eat grass, and stored hay in winter. Quite a bit of acreage is required to grow that much “pasture salad,” as the tour guide called it.  Apparently when they switched from grains to grass, milk production went down.  But so did costs, so things balanced out in the long term.

2. Calves get to stay with their mother for 4-6 weeks after birth. Apparently you get much healthier calves this way.

3. The cows live a bit longer than they would if they lived on concrete, inside, their whole lives.

4. The cows still become hamburger, after 5-6 pregnancy and lactation cycles.  Sorry, but it’s true.

I know very little about dairy farming. But I liked everything I saw and heard at the farm this weekend. There were so many things to think about — and I’ve already gone on and on about how much healthier grass-based dairy products are.

This is going to sound a bit melodramatic, but I looked at this farm and saw a way to save the rural America I grew up in and love.  By making farming a bit less efficient, you instantly need many, many more farmers than we currently have.  Farms get smaller again.  Families can be supported by a smallish farm.  Rural communities have an economy again.  Everyone wins.  You can set aside the health, environmental, and animal welfare implications of “agribusiness” as we know it, and the bare economic facts point to smaller, greener farms being much better for people and communities.

Now the challenge: how to talk people into making the switch to milk that costs twice as much. And, how to get the government to subsidize farm programs that actually benefit real farmers instead of corporations — because conventional dairy farming, like so much else in our society is partially a product of subsidies both to corn and oil. It’s not sustainable. Things have got to change.

[ Blushes, thanks you very kindly for reading this far, and steps off soap box ]


3 Comments

DIY inexpensive path

The back yard is finally getting some much-needed attention this year. I don’t have fully-formed plans for it, but they’re starting to take shape. To start with, we had a dirt path from the deck to the back gate that was often muddy. Here’s how we made it into a real path for less than $50:

Adam, his dad and Rowan widened and flattened the dirt path, removing the sod on either side and making nice edges and smoothing out the bottom. This included removing some very stubborn old tree roots from trees we had cut down almost two years ago.

OK, Rowan did not actually wield the ax. But he did help a lot with hauling away loads of dirt and sod in his little wheelbarrow.

Here’s the part where we got lucky: Adam’s aunt had a load of patio pavers that she didn’t want and gave them to us for free, which was so nice. And then Adam’s dad hauled them down to Minneapolis in his truck. So this project was made possible in great part by the kindness of relatives.

Adam and Rowan set the patio pavers along both edges of the path, making them nice and secure with some sand borrowed from the sandbox.  Then we filled in with $45 worth of cedar chips.  The final project:

The yard looks so much nicer already! A wood chip path is not necessarily a permanent installation, but that’s perfect: if I change my mind about the layout of the backyard, it won’t be an ordeal to move this path. I plan to put wood chips down on a fairly significant portion of the back yard this summer — there are several areas where grass just doesn’t grow very easily, so I see no point in trying.

We will maintain some grass for the kids and dog to play in, don’t worry!


11 Comments

Recipe: Garlic scape pesto with fresh herbs

Adam and I came up with this recipe to use up this year’s considerable garlic scape harvest:

Parsley, basil, and scapes ready to go.

Garlic scape parsley basil pesto
1/2-1 c. basil
1/2-1 c. parsley
1-2 c. garlic scapes
2-3 T. pine nuts
1 tsp. salt (or more to taste)
pepper to taste
extra-virgin olive oil, at least 1/2 c.
1/3-1/2 c. parmesan cheese, grated

Amounts are approximate, because we used a ratio: 1 handful basil, 1 handful parsley, 2 handfuls scapes. We went light on the pine nuts and parmesan. Put the scapes, herbs, pine nuts, salt, and pepper in a food processor.  Process, adding the oil a bit at a time, until desired consistency.  Stir in parmesan cheese.  Taste and adjust seasoning accordingly.  Makes about 1 1/2 c. pesto.

Naturally, we quadrupled the recipe. Should keep in the freezer up to 6-8 months. No worries that it will last that long.


2 Comments

Cabbage worms

I KNEW it! I knew I would jinx myself by mentioning my lack of cabbage worms. They’ve struck:

Gardening peeps: are all those dark spots eggs or cabbage worm poop?  Oh man, I hope they’re not eggs. They also did a number on my lacinato kale, which is right next to the cabbage:

Here’s one of the guilty culprits, shortly before his execution:

Trouble is, I can’t spray my cabbage with garlic spray right now because it’s so darn rainy. And it’s supposed to rain all day tomorrow too.  We carefully inspected our cabbages (top and bottom of every leaf), and found and killed three large worms today.  Hopefully the damage will be minimal until Friday when it’s supposed to dry up. Then I can get in there with the garlic spray and do some deterrent work.

Speaking of cabbage damage, here’s a picture from the Hennepin County Master Gardener plot at Sabathani that I help manage:

We planted three different kinds of cabbage: green, red, and napa cabbage (along with some dill). The circles are where the green cabbages are supposed to be.  I think this is the work of a larger varmint, because they were just decimated.  Two of them are trying to make a comeback, but we’ll see.  This is the best illustration I can think of for planting variety.  Whatever this was, it was uninterested in the napa and only slightly interested in the red cabbage.  Therefore, our crop was diminished but not devastated.


6 Comments

Garden update, mid-June

It’s the middle of June already! Time to check in on the edibles around the yard.

my urban garden

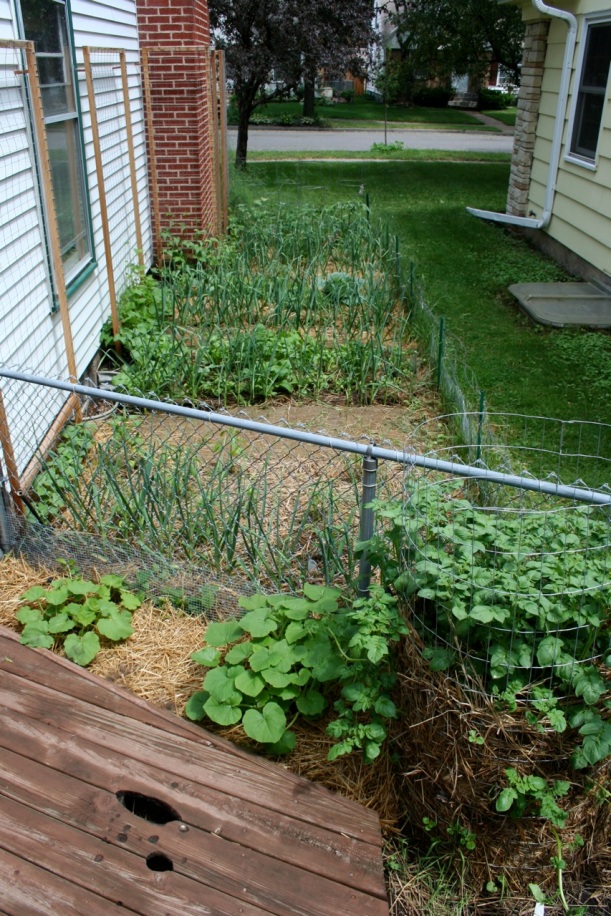
Things are coming along swimmingly in the garden. Dare I say it? Best garden year ever?! It might be a bit soon, I better not jinx myself. Look at the pumpkin, squash, and potato tower in the foreground! Happy to report that rabbits do not seem interested in pumpkin or squash plants. [phew]

The Tom Thumb peas that the kids planted back in April (see picture at the top of the page) are finally just about ready. They are in a part-shade spot, and I don’t think they get *quite* enough sunshine to have reached their full potential. But we’ll get one solid meal, anyway.

Rowan’s garden, with a couple of radishes left and some rather pathetic-looking “Gourmet Lettuce Mix” from High Mowing Organic Seeds. We had a couple of hot days.  Also, I should have thinned a bit more. I am going to give this another 7-10 days and if things don’t look better, I’m ripping it all out and planting some quick-growers that we could harvest before fall: turnips, radishes, and maybe some kale.

mesclun mix

Anneke’s garden, on the other hand, is looking spectacular. We planted it with a 50/50 mixture of Burpee Organic Mesclun mix and rainbow chard. I’ve thinned it quite a few times, adding the baby greens to our salad bowl as we go. I don’t know if this mix is more heat tolerant than the other, but I think it has a greater variety of lettuce types. The arugula we thinned out and ate early on; it’s gone now. All that remains are the hardier greens and lots of chard, filling in nicely.

bee pollinating a raspberry plantBees are hard at work to give us raspberries in a few weeks.

Alpine strawberries are loaded with fruit. Picking and eating immediately, every single day for about a week now.

Regular strawberries are just getting going — picked the first actual bowl full tonight.

comparing alpine strawberries with regular

Anneke was kind enough to stop eating strawberries long enough for me to shoot a quick comparison shot — alpine strawberries are tiny! The strawberry on the right is a standard size, like what you’d get at a pick-you-own farm (note: still smaller than grocery store strawberries). If making jam is your thing, you’d better plant 500 alpine strawberry plants and plan to spend your entire day picking.  Rather, alpines are great for eating fresh, especially when you have a part-shade situation. Regular strawberries will not produce much at all in part-shade, but alpines will.

Blueberries! I pinched off most of the flowers on this plant, because it’s still so young, but I had to keep at least a small handful of berries for my efforts.

Tomatoes. Absolutely mental. Could this be the year when I finally have a good tomato crop? Could it? Pretty please?

Cabbage area. Lots of things going on here: two cabbages, chamomile, rosemary, kale, carrots, garlic on either side, a sage in the back, and chrismas lima beans climbing the trellis to the right. Didn’t have great carrot sprouting rates, hence the couple of semi-bare areas. Look at how free of insect damage my cabbages are. Unbelievable, considering the cabbage worms I dealt with last summer. Could it be that surrounding my cabbages with herbs and garlic confounded them? Hard to say for sure.

This area looks like total chaos but it’s actually quite nicely ordered according to my plan. It includes: golden beets, red beets, turnips, celeriac, parsley, rosemary, and some nice green pole beans climbing the trellis in the back to the right.

Finally, the peppers and eggplant, with cuke plants finally reaching up toward their trellis at the back. Everything is kinda slow-moving in this area so far, so I hope growth rates pick up.

OK, that’s it! Lots going on here!


13 Comments

DIY potato tower

Last fall I came across this idea for a way to grow lots of potatoes in a very small space.  This year I’m trying it in my yard.  I made a couple of improvements on Stefan’s design, after eavesdropping (so to speak) on a conversation on his Facebook page.  Without further ado, here’s how I did it:

1. Bend some steel fencing into a 36-inch diameter circle and fasten. Ours is nearly 5 ft. tall, but it does NOT need to be… 3-4 feet tall would be plenty.

2. Make a nest of straw in the bottom, and fill it with a 50-50 mixture of compost and old leaves.  Nestle 5-7 seed potatoes, with eyes pointing to the outside, all the way around the circle.

3. Get a soaker hose in there, too.  Continue layering up: straw, compost/leaves, seed potatoes, soaker hose, repeat until you run out of seed potatoes.  Put a final topping of compost and straw on top, and you’re done.  Here’s another view:

Here’s the completed potato tower:

It needs to be in a sunny location. Stefan of Growing Lots claims that people have gotten upwards of 25 lbs of potatoes from 5 lbs of seed potatoes in towers like these.  The two main changes that we made from his design are putting in the layers of straw, adding the dry leaves, and the soaker hose.  He pointed out that it’s really difficult to water the lowest layers, without it.

And here’s what it looked like about 3 weeks later (about a week ago). The plants are even bigger now.  There aren’t quite as many sticking out of the bottom as I would have thought, but it seems like the majority of the seed potatoes sprouted.  Now we wait!

See the post from Fall 2011 when we harvested our potatoes.


2 Comments

What can we eat NOW?

Last weekend I did my annual Memorial Day phenology photo shoot in the garden. Phenology is the science of tracking when, for example, the daffodils first bloom in a certain location.  It’s becoming a very important science for documenting climate change.

Beginning gardeners are often disappointed by how long it takes to finally have something to eat — tomatoes and peppers don’t produce much until late July, if you’re lucky.  So what are some things we can grow that will give us early eats?  Look to edible perennials in the landscape, my friends.  Let’s take a tour of some of the goodness we’re already enjoying in late May in Minnesota.

Asparagus and strawberries. The asparagus seeded out a couple weeks ago — the plants are finally mature enough that next year we should be able to harvest some. Boy, it’s been a long wait. Strawberries should be ripe in 7-10 days, and new anti-rabbit netting seems to be helping.

Dill. It’s needed thinning several times anyway, so I’ve been adding the tiny plants to salads and dressings.  Dill is not technically a perennial, but it re-seeds itself.  In great numbers.  Plant it once and you’ll always have it.  Everywhere.

Lettuce and radishes! YES! We need to eat these up as fast as we can because the forecast for this week is hot.

Left to right: oregano, garlic, and chives (dying tulips in the background). Chives were one of the first things that came up when the snow cleared out — we’ve been eating them since late April.  I’ve also dried some oregano. Garlic scapes will pop up in the next two weeks.

Chive flowers, which are also an interesting addition to salads. I prefer to eat them before they open, though.  It’s a texture issue.

The kids with their first harvest of lettuce and radishes from their gardens (in the background). I’ve read that involving kids with gardening can encourage them to eat more vegetables, but seeing it with my own eyes has been freaking awesome.  My almost-4-year-olds, picking radishes, brushing off the dirt, and eating them while jumping on their trampolines.  Strange but fun.